Precursor to WordPerfect - Program Editor. I posted some time ago looking for a WordPerfect-like editor that pre-dated WP that I used to use. As with many things, the thought would nag me from time to time. Back in the mid/late 90's, I helped the local newspaper move articles from electronic word processing files to their webpage news section. It was tedious to say the least. As I thought of that, I could not remember the name of the program I used. I reached out to an acquaintance, who used to work with the same local paper and who helped run the dialup freenet we had at the time, to see if he could remember it. Sure enough, he remembered: Program Editor. The recalled history goes something like this: Professor at BYU creates Program Editor which then eventually becomes WordPerfect shortly afterward. When he told me this, I recalled the newspaper owner telling me that story back when he handed me the floppy disk. In fact, he would hand me a disk with the program on it plus several files with the week's news articles. I would save the text to be posted online (the exact steps elude me, but I think I used Windows 95 to run a DOS window then use copy/paste to move the text from the Editor window to a text file, then edit the text file for html to be ftp'd to the site - that might not be exactly right, I have slept a time or two since those days). In any case, I thought I would share this in case any other DOS die-hard wanted to take a trip down memory-ish lane. BTW, if parts of the history aren't quite right, feel free to add corrections below.
Mar 4, 2025
Jan 8, 2025
Reset MacOS Spotlight Index
If you notice files/folders suddenly seem to be missing on your Mac, your index may be corrupt. Here's how I fixed it. Note: These steps were found on a Reddit post and are being posted here so I can find it easier.
- Open the Terminal in the Utilities' folder.
- Copy each line below then paste it at the Terminal's prompt and press RETURN.
- You will be prompted to enter your admin password. It will not echo back to the Terminal window. Press RETURN again. You should only be asked when you run the first command.
- These are the commands (one per entry):
- sudo moutil -a -i off
- sudo mutil -a -i on
- sudo mdutil -E
Hope this helps!
Note: There was an extra line (sudo rm -rf /.Spotlight*) in the steps above, but many comments indicated that the command was redundant and unnnecessary.
Jul 22, 2024
How to Disable Mac Virtual Keyboard on Login Screen
We had a MacBook that showed a virtual keyboard on the login screen. If we clicked the X in the upper left corner, the keyboard disappeared until next login.
We checked all the accessibility settings we could find in the System Preferences, but everything was UNCHECKED. Keybard still showed up.
We discovered there is a DIFFERENT and apparently separate Accessibility Options menu!
Press OPTION-COMMAND-F5 to bring up the menu:

UNCHECK the box next to Accessibility Keyboard.

That should remove the keyboard from the login screen!
Jun 4, 2024
How to Set Minimum Row Height in Canva Tables
When you create a table in Canva, there is a default row height:


NOTE: This is in the standard version of Canva. Steps may be different for "Glow Up."
Apr 24, 2024
A Chat with MrChikri via Celebrity’s Hacked Twitter Account
by David | Nov 9, 2016 | General Education, Interview, Quick Tip | 0 comments


Apr 13, 2024
Reset TCM 2014 Ford Focus Transmission

1. Run the car and set trans to neutral.
2. Turn off and wait 15 seconds.
3. Shift to Park.
4. Turn the ignition on (Not running), wait 15 seconds
5. Turn to off, then ignition on (not running)
6. Shift to neutral (you may have to press the brake to do so)
If successful you should see "Transmission Ready" on your dash.
I have done the above method successfully on my mother’s car. Lasted about 9 months or so (we can’t remember when it was done).
Possible alternate method:
Turn off car
Turn ignition to ON (do not start)
Press gas pedal to floor and hold for 10 seconds
Turn off car
Release gas pedal
Wait 2 minutes
Start car and drive, slowly accelerating through each gear and the slow down to cycle back through gears.
I have done the above on my mother’s car when the transmission started acting up again. Don’t know how long this will last.
Mar 8, 2024
The Goodbye Letter: Compute!'s Gazette 1995
 |
| Gazette masthead, recreated by David Henderson |
While falling down the rabbit hole that is nostalgia-induced Internet diving, I came across an archive of every issue of COMPUTE!'s Gazette ever published. I read through the very first issue. It brought back a flood of memories from my childhood - the ads, the "new" technology, the type-in programs.
Gazette, February 199564/128 VIEW: Time to Say GoodbyeBy Tom NetselIn July of 1983, a new magazine devoted to the Commodore VIC--20 and the Commodore 64 hit the newsstands. Founded by Robert Lock and edited by Thomas Half hill, that magazine was called COMPUTE!’s Gazette. After almost 12 years, numerous editors, and several changes in format, Gazette ceases publication with this issue. This is the last Gazette.When Gazette started, Commodore was selling more than 100,000 VIC-20s and 64s each month. Dozens of software suppliers were rushing products to this rapidly growing market. The initial press run for Gazette was 175,000 copies, up from an originally planned 75,000. And all this was at a time before the 64 itself really took off to become the most popular home computer ever built, selling more than 14 million worldwide.If you look back at that first issue, you'll notice that Fred D'Ignazio had a column that was called "Computing for Kids." Jim Butterfield’s name appeared on the masthead as an associate editor. You'll find their final columns in this issue.Larry Cotton is another long time contributor. His "Beginner BASIC" column has been a regular feature for many years.A few years ago, I was looking for someone to write a GEOS column. It had been an on and off feature in Gazette, but readership surveys told me that there was considerable interest in this operating system from Berkeley Softworks. I went searching for someone to write a monthly column. I'll have to thank Robert Nellist for recommending Steve Vander Ark for the job. Robert and Steve had been corresponding for some time about GEOS, and he suggested I get in touch with Steve. I did and Steve agreed to supply Gazette with a column each month.Sometime later, I wanted a column to pay tribute to the great work being done by programmers who offered their work as public domain. Steve volunteered to do it and added "PD Picks" to his busy schedule. It was about that time that Robert wrote me a letter complaining in a good natured fashion that while Gazette had gained a columnist in Steve, Robert had lost a pen pal.The junior member of the Gazette columnists is David Pankhursto The author of fantastic spreadsheets, Calc and Calc II, David took over the reins of "Programmer's Page" a little more than a year ago. Each month he has supplied a number of good programming tips from his own library and from those submitted by our readers.I'd like to thank all these gentlemen for their great contributions to Gazette, without their help, this magazine couldn't have lasted a fraction of the time it did.Last, but by no means least, I want to thank all of you readers who have submitted programs to Gazette over the years. My biggest regret is that I still have so many good programs here that I'll never be able to publish. My budget allowed me to buy only so many each month and I still have almost 30 submissions still in my Pending basket. Gazette had a number of staff programmers in its early days, but it has been our readers who have supplied the bulk of the programs that we've published over the years. To all of you who have submitted a program, I offer you my thanks. Without your submissions, this magazine would have folded years ago.Gazette's closing follows shortly on the heels of COMPUTE's demise, but it is for totally different reasons. COMPUTE was bought and closed because a competitor didn't want the competition and was hoping to convert those subscribers to its publications. Gazette is closing simply because there aren't enough Commodore enthusiasts subscribing to make Gazette profitable.So what's going to happen to your subscriptions? You'll have one of three options, but as I write this the week before Christmas, I don't know all the details as yet„ We are talking with other publishing companies that may have an interest in taking on our outstanding subscriber liability. If one of these companies takes over, then you will be offered a Commodore-related publication equal in value to the number of Gazette issues yet unmailed.The other option is that you may elect to take the remainder of your subscription out in Gazette disk products. The specialty disks that we offer, such as SpeedScript and the GEOS Collection, are examples.The final option is to simply request a refund of the remainder of your subscription. Each unmailed issue is worth approximately $2.50.As I said, negotiations have just started and I don't know what the outcome will be. You will be contacted shortly with an explanation of your options. I'm sure some of you will be getting letters asking you to renew your Gazette subscriptions. These mailings are scheduled months in advance and some undoubtedly will be mailed out after I write this. Please ignore them.Normally, publications close and readers learn about it after the fact. With Gazette being on dii»k and having a short production time, I was able to convince the powers that be to give me this final issue in order to say good. bye. As I said, I don't yet have all the answers but I was at least able to offer some word of explanation as to why you won't be getting any more Gazette's after this one.COMPUTE Publications will still be around, but involved with online publishing. COMPUTE Online has been on America Online for 18 months and it will continue, but with a new name. Starting in February, it will be called I-Wire. It will also be on the Internet with a world wide web home page. I have been the online editor during this time and I will continue with my duties there and as editor of Saturday Review Online.Once again, thank you for your support over the years. Keep those 64s and 128s humming. It's been a pleasure.
Gazette, February 1995
Jul 31, 2023
Force Apple Captive Portal Login
If you try attaching to a guest wi-fi with an active portal that doesn't seem to want to trigger, try this:
http://captive.apple.com/hotspot-detect.html
Hope this helps!
Aug 25, 2021
Acer TravelMate Disable Secure Boot
I was working on an Acer TravelMate that would NOT let me install Windows 8 or Windows 10. Turns out, the SECURE BOOT option was ENABLED and that was the culprit. Unfortunately, the BIOS would not let me select the Secure Boot option to change it. Turns out, there is a VERY easy fix:

Hold down F2 during startup of the laptop to enter the BIOS.
Select menu "Security" using the arrow keys.
Select "Supervisor Password" using the arrow keys.
Press Enter to get the dialog for setting the password.
Type in a password and Enter.
Retype in a password and Enter.
Remember the password somehow! You will be prompted for it the next time you try to enter the BIOS.
Press Enter to dismiss the dialog.
Select "Boot" using the right arrow key.
"Enabled" for "Secure Boot" is no longer greyed out (and can be changed to "Disabled")!
Optional: Set the "Supervisor Password" back to empty.
Select menu "Exit" and menu item "Exit Saving Changes" using the arrow keys. Press Enter for "Yes" in the prompt.
This came from a forum post and I decided to post it here in case that post should disappear: : https://askubuntu.com/a/1001155
Jul 23, 2021
First Saturday Computer Flea Market, Dallas Texas (1st Saturday)
Way back in 1994 or 1995, a group of my co-workers told me about a computer flea market in Dallas, Texas, that only took place at night. I was skeptical. Turned out to be true! What appears below is from an archived web page I had on the subject. NOTE: So far as I have been able to determine, the flea market has been long defunct.
So, you've been trying to figure out how to get to the now famous Dallas Computer Flea Market? Well, look no further! I thought the once a month, midnight computer flea market in Dallas was a big secret or something. It took a lot of digging and prodding, but my family and I found it. We wanted to be sure that NO ONE else ever had to go through what we had to, so:
The Dallas Computer Flea Market (aka 1st Saturday) is located at the corner of Ross Avenue and Routh streets in downtown Dallas. The closest approximation I could come up with is North Central Expressway and Ross Avenue. The market actually takes up several parking lots near the Ross/Routh intersection, but the vendor check-in (thus, most vendors) are in the lots at Ross/Routh.
The vendors start setting up around 11:30 p.m. on the first Friday of the month, but actual set-up starts at Midnight Saturday. When we went, we started at Midnight and hung out until about 4 a.m. I'd say the best time to get there is around 3 a.m. Most of the vendors are there and it's pretty kickin'. The whole things closes down at noon on Saturday, so don't wait! Have fun!
We hope this helps! If you have ANY questions, please contact me: David Henderson
Here's a map for clarity (The general area is marked in RED):
THIS MAP IS ABOUT 85k! (Note: Back in those days, this was a HUGE picture - haha!)

- The area marked in red was the parking. The actual event took place southwest after you crossed the street under the freeway.
- Note the hand-drawn black lines to indicate a new highway being built! That is now 366 (Sorry I don't know the local name for the interchange).
May 26, 2021
FortiFone FON-175 Silent Ring Mode

On the FON-175, the MUTE button does more than just mute the microphone, as I recently discovered. The MUTE button also places the phone into "Silent Ring Mode."
When the MUTE button is activated while NOT in a call (that is, when the handset is on the base), the MUTE button will toggle the Silent Ring Mode feature. This prevents the phone from ringing audibly during a call. The red light will flash during an incoming call, but the phone will not ring.
In order to toggle the setting back again, press the MUTE button while the handset is in the base and is not in use.
Hope this helps, as this terminology (Silent Ring Mode) is NOT referenced in the user's guide.
May 14, 2021
Remove and/or Disable the Preview Pane in Windows 10

a) Press “Windows Logo” + “R” keys on the keyboard to open the “Run” command box.
b) Type “regedit” in the “Run” command box and press “ENTER”.
c) Now, navigate to following key:
HKEY_CURRENT_USER\Software\Microsoft\Windows\CurrentVersion\Policies\Explorer
d) In right-side pane, create new DWORD “NoReadingPane” and set its value to 1.
(To create a new DWORD, click on the option “Edit” at the top, select “New” and then select the option “DWORD” from that sub-menu.)
e) Restart or log off your system and "Preview Pane" button will get removed from Windows Explorer command bar.
To restore the "Preview Pane" button, you can either remove DWORD or change its value to 0.
(Taken from: https://answers.microsoft.com/en-us/windows/forum/windows_7-desktop/how-to-hide-the-file-preview-pane-on-the-browse/36e8da9c-10c0-4ac0-ab16-284fea930075 and placed here to make it easier to find.)
May 5, 2021
Windows 10 Prints Only One Copy
tldr; Change the Print Driver to "Windows Software Printer Driver"
I had a user with an issue where their Windows 10 computer would only print ONE copy of a document regardless of how many copies they specified.
I researched the problem and found that for anyone using HP, there is usually an option under Device Settings to disable Mopier. That's great of you are using an HP. But, this person was using a Lexmark MFP network device. So, no Mopier setting.
The computer did NOT have the Lexmark Universal Driver installed. Frankly, that probably would have solved the problem. Instead, the system had found the printer and installed the driver using the Microsoft Windows IPP Class Driver:

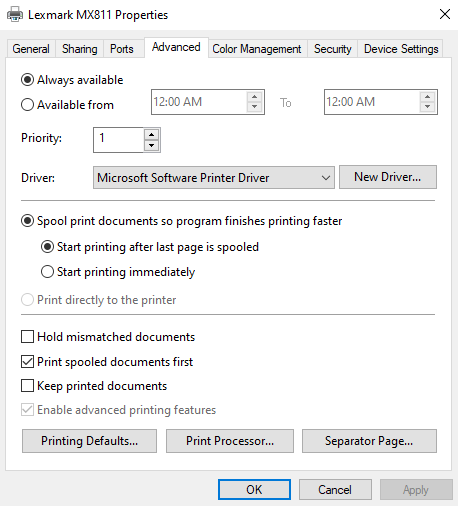
This allowed the user to print all the copies desired.
Apr 15, 2021
Thin Client: devonIT TC2D

I picked up a DevonIT TC2D "Zero Client" device for about $5.00 on eBay. It came new in the box (or appeared new) with a power adapter, instructions, and a DVI/VGA adapter. Let's look at some specs:
CPU - VIA Eden 1 GHz
GPU -VIA VX855
RJ45 (Wired Ethernet) -Realtek 8110SC
Sound -Azalia HDA Controller (VT1708s)
Storage -1GB DOM (2.5-inch IDE riser connector)
RAM - 1xDDR2 SODIMM
USB Ports -4x USB 2.0 (2 on back, 2 on front)
Video Ports - DVI Connector
Power Requirements - 12V, 3A AC Adapter
Other Ports -PS/2 Keyboard connector on back, Kensington slot on back
BIOS: Phoenix AwardBIOS
OS: DeTOS 7.1.1 20120508
Notes: HDD Auto Detection, Provisions for IDE Slave Device, Set Boot Priority, Boot from USB, Azalia Disable Feature, USB Settings (KB/Mouse can be set to USB), Power Management Options.
OPERATING SYSTEMS:
DeTOS 7.1.1 (05082012) (1GB RAM, 1GB DOM) - The unit came with DeTOS 7.1 installed. I did a complete post on my experiences with it: HERE
Briefly, DeTOS brings you to desktop with very limited options: Control Panel or Reboot/Shutdown. The Control Panel allows for some basic configuration and includes Firefox Aurora browser.
ZeroClient WORKS (1GB RAM, 1GB DOM) - Selecting this option during setup reboots the system to a simple login page. Note: After trying to revert back to DeTOS, system boots to blank desktop.*
DOS 6.22 PARTIAL (1GB RAM, 2GB DOM) - Installed from bootable USB floppy. PC Speaker only since the audio is HD. I tried various TSRs, but none worked for sound. Games like Doom and Duke3d run very nicely! I was able to run VESA800x600 Duke3d smoothly.
WFW 3.11 PARTIAL (1GB RAM, 2GB DOM) - Installs fine, but has weird screen issues upon boot. Changing the driver to VGA Version 3.0 helps get into the system. PC Speaker only since HD audio is HD. I tried to use HDADRV9J, but I never heard sounds.
Windows 95 PARTIAL - (2GB RAM, 16GB DOM) - Booted from DOS USB. Copied setup files for Win95. Ran setup. After first reboot, had to edit the system.ini file [386enh] with MaxPhysPage=3B000 due to 2GB ram. Windows installed Active Desktop (blech!) which I promptly removed. Tried to install various Chrome9 Drivers, but none worked. Could not find network drivers. Sound would not work either, since it is HD audio.
Windows 98SE WORKS (2GB RAM, 16GB DOM) - Copied Win98 install files to Win95 DOM above. Booted Win95 to Command Prompt only. DELTREE c:\Windows then started Win98 setup. After first boot, fix the memory error by adding the MaxPhysPage=3B000 to system.ini (Safe Mode Command Prompt). I found Realtek "universal" drivers for the LAN Card (HERE). Go to Device Manager and on the General tab, use the "Reinstall Driver" option then find the INF file. I also installed "LANLights" to display network connectivity in the system tray. I tried to install Win98 USB drivers, but the system locked up and reported no mouse connected upon reboot. I reinstalled Win98 on top of the currently installed OS. I used the "Generic PCI to USB Host Controller" driver from Windows and USB started working. I installed VBEM VGA drivers to help with display resolution and color depth.
Windows XP w/SP3 WORKS (2GB RAM, 16GB DOM) - Booted from USB installation (made from XP ISO and Rufus 3.x). Installation went normal, though VERY slow in places. After setup, three devices were missing. The drivers for these can be found HERE.
Windows 7 WORKS (2GB RAM, 16GB DOM) - Booted from USB installation (made from Win 7 ISO and Rufus 3.x). Had to clear the partitioning. Installation started. SLOW process. Win 7 detected all but the video card. Had roughly 6GB free upon first boot. I tried several different ways to install the VX855 driver for Windows 7, but each time it told me that the software was "not compatible with this version of Windows), even though it was asking for 32-bit Windows 7 in the error. Weird. I found VX900 C9-HD IGP drivers that worked! I had to go to the VGA adapter in Device Manager and force it to update the driver from a folder I chose. It wasn't happy about the driver, but let me install it anyway and after reboot, resolution was set to 1440x900 (matching the monitor I was attached to). Nice! I did run into an issue with DOS games in that these video drivers would not allow the system to switch to full screen mode. Here is a link to an article about how to fix that (basically, revert back to the generic vga drivers).
Windows 8.1
Windows 10 FAILED (32-bit) (2GB RAM, 120GB SATA Drive) - I attempted to install Win10 32-bit on the device, but kept getting an "IRQ Not Less Or Equal" blue screen error. In order to use the SATA drive, I bought an IDE-to-SATA adapter. I swapped the SATA drive for a 16GB DOM, but had the same result.
*Feb 25 2021: I ran into issues with the system itself after switching over to the "ThinOS" option. I reached out to Clientron in Japan and was sent a link to a reflash utility. I ran the utility, installing the flash software onto a usb drive. After booting the device from the drive, I followed the prompts to reinstall the software onto the original DOM. I recommend NOT having a mouse plugged in. My system screen was filled with connects/disconnects coming from the USB mouse which didn't seem to affect the install process, but made following along difficult. After it finished, the system rebooted. I was greeted with the DevonIT boot screen and then the screen went blank for a bit. I tapped an arrow key and was met with the OS selection screen as above!
Mar 8, 2021
Thin Client: Neoware CA10 (BL-Q2-JD & BK-00-00) (Updated: 03/17/2021)
 |
| Rear view of opened ca10 |
NOTE: Updates appear at the bottom of this article.
I bought this version of the CA10 because, well, it was blue. I hadn't seen a blue version before. Turns out that the reason it is blue is that COMVoice had them painted that color. I bought it "as is" for about $10USD.
SPECS:
CPU - VIA C3 800MHz / 1Ghz
GPU - Apollo CLE266 (VIA UniChrome) (shared memory up to 64 MB)
RJ45 - VT6103 Built in PLUS a PCI 3COM NIC
Sound - VT8235M/VT1612A AC97 (Selectable MIDI port addressing and IRQ)
Storage - 256MB DOM (44-pin IDE PATA)
RAM - 1x256MB PC2100 (2 DIMM slots total, 1 available)
USB Ports - 4 Total (@ on back, 2 on front)
Video Ports - VGA / DVI
Power Requirements - 12v 4A, though I was able to use 12V 3.5A
Other Ports - PS2 Keyboard, PS2 Mouse, Line in, Mic out, Two 9-pin serial, 25-pin parallel (printer), PCI
BIOS/CMOS - Phoenix AwardBIOS P640 V:5.03.20F-110205, Ver 6.00 PG, 11/02/2005
Installed OS - Just enough FreeBSD to boot, then system hangs.
The BIOS in this thing allows you to boot from just about anything - HDD0/HDD1, floppy, LS120, SCSI, CD, a slew of USB devices, and more. I could *NOT* use a USB keyboard. However, the BIOS has an option to enable USB keyboard support and that was disabled. I enabled it and was instantly able to use the USB keyboard while still in BIOS. Whoa. The BIOS allows the user to set memory speed timings, theoretically opening the door for some overclocking.
 |
| Crystal sound card shown along with ide-to-sata cable and 768mb RAM. |
The unit I got had high corrosion and would only post every so often. I swapped DOM cards and tried IDE/SD Readers, but the system always corrupted the drive data. Instead, I created a bootable microsd with DOS 6.22 and tried with that plugged into the USB port in the back. That, too, eventually quit working at random intervals.
Below is what I could make work for short periods of time:
DOS 6.22 PARTIAL (256MB RAM, 2GB DOM) - DOS installs. None of the sound drivers I downloaded would allow the audio to play in DOS games. Sound only worked via PC Speaker. However, I installed a Sound Blaster Live! PCI card and the DOS driver. It works very well! Games like Wolf3d, Duke3d, Doom, Ultima Underworld 1, etc had digital sound and music.
WFW 3.11 PARTIAL (256MB RAM, 2GB DOM) - Installed fine, but again no sound drivers.
Windows 95 PARTIAL (256Mb RAM, 256MB DOM) - I had to delete everything except just enough to boot DOS with HIMEM.SYS after copying the Win95 installation folder to the drive. I also deleted AOL*.*, MSN*.*, CHL*.CAB, and possibly a few other files from the Win95 setup directory. I chose the "Compact" installation. I chose to select options not to install, but the only options were Disk Defrag and Disk Compression. So, I deselected them. Setup asked for the now-deleted AOL files, but I told it to just Skip them. When Windows installed, it wanted to set up active channel. ctrl-alt-del to bring up task manager. Kill IE4Setup then kill the Active Setup. You are now at the desktop! At the end of the install, I had 82 MB free. No sound, etc since sound is HD. (Though could install the SBLive and use Win95 drivers).
Windows XP WORKS (768MB RAM, 120GB SATA) - I installed a DOM-to-SATA adapter then plugged in a 120GB 2.5 SATA HDD. I booted from a WinXP setup disc. This is a SLOW process. I don't think I have ever seen every single pre-loaded driver's name on the screen before. Usually those whip by. Not with this device. The network card was detected during setup. I disabled everything but TCPIP when prompted, as I had encountered blue screening during certain phases of the installation. After installation, I installed Vinyl7b (v700b.zip) drivers for sound. For video, use the UniChromeIGP driver. Video supports DX7, DX8, and DX9. I did not test anything beyond DX9. Research shows that XPEmbedded was the OS of choice for this, so it makes sense that XP does moderately well once installed.
Windows 7 WORKS (768MB RAM, 120GB SATA) - I installed a DOM-to-SATA adapter then plugged in a 120GB 2.5 SATA HDD. I booted from a Win7 setup DVD. This was *NOT* fast! It took nearly 10 minutes to get to the partitioning screens. Once setup finally finished, I was able to install Crystal CS4281 drivers to go along with the PCI sound card I had installed using the riser adapter. Unfortunately, the system always reported "not enough resources." I thought this was an IRQ/DMA issue, but after disabling a bunch of built-in devices, I believe the issue is simply that no Windows 7 driver exists (that I could find) for the card. The system functions, but is much too slow to serve as anything other than novelty.
TBD: Windows 8.1
TBD: Windows 10
*NOTES:
03/17/2021 - I installed a SBLive (CT4830) using the PCI slot and a 90-degree adapter. I installed the DOS drivers for it and after a reboot, I had Sound Blaster emulation running for DOS games!
03/16/2021 - I received a replacement unit that was a slight "upgrade" from my original board. This one has the "BK" designation, indicating it had the DVI connector on the back in addition to VGA and the processor is bumped to 1Ghz. Everything else, so far as I could tell, was the same.
03/12/2021 - Unfortunately, after the initial Win95 install, the unit would no
longer POST. I think the corrosion on the motherboard finally caused the
thing to bite the dust.
I do plan to get a replacement motherboard, though. I just can't help myself. I love this blue case and the form factor will make for a fun little retro machine.
I received a new board on 3/11/2021, but it was DOA - it would show a red light when plugged in and I could press power, but it would never boot. The company I bought it from is doing a cross-shipped RMA, which is very nice of them!
The original board went through some more testing. I was able to get it to boot so long as it was out of the case AND the power button panel was no longer screwed into the case. I surmised we had a grounding problem. This was confirmed by experimenting with various configurations on the system inside the case and out. I eventually laid a piece of anti-static bag under the system board. This works intermittently, but more often than not working.
Mar 5, 2021
Thin Client: Wyse WT1200Le (Updated: 03/15/2021)

Picked up this thin client hoping to make a fun little DOS machine out of it. Turns out, that's a bit of an issue. The device will not boot to USB. There is also no accessible BIOS/CMOS that anyone has discovered so far as my research goes.
Let's look at specs and such.
CPU - AMD Geode GX
GPU - Geode GX CS5530A
RAM - 32MB (Soldered onto motherboard)
Sound - LM4546AVH (AC97)
Storage - 512kb SoC (System on Chip)
RJ45 - Pulse PE-68515L 10/100
USB Ports - 2 on back
Video Port - VGA
Power Requirements - 12v 3.33a
Other Ports - Headphone, Mic
OS - Wyse ThinOS
BIOS - Winbond; not accessible by keyboard so far as I have been able to determine.


System booted and within seconds, presented a desktop that appears to be some kind of no-frills Windows 98 or XP, but is more likely some version of Linux.
A "System Information" window opened up for a few minutes as the system grabbed an IP address. That screen disappeared and a "Connect Manager" screen popped up, trying to connect to "jtc-gp." Of course, that failed.
System Information shows Memory (32MB) and ROM (512k). There is a NAND Size option, but it shows zero, as there is not storage device on the unit. The 32MB RAM is soldered onto the motherboard but there are no means for expansion without soldering a SODIMM socket to the thing.


The "Start" button says "Desktop," and leads to a variety of applications to examine. System Setup provides options for setting preferences, configuring network and display, and setting serial/parallel ports (even though the unit doesn't actually have any).


System Preferences cover naming the device, time zone, DST, and other options.

The Network Setup allows for assigned or DHCP addressing.

There is a wireless setup screen, but there is no wireless adapter in the unit. There is a header for a micro-wifi card, but there is no socket soldered in the spot.


As you can see, there are a few more tools - PPOE Manager, Dialup Manager, and PPTP Manager for handling different types of connectivity. The Network Test section has Ping, Trace Route, and Print Queues.


I did not provide a username/password combination when I set up the connection, and the server promptly provided the login screen for me to enter my credentials.

All in all, this is a very simple device for folks who want to provide no-frills access to network resources. Parkytowers has a cool write-up about this thin client and addresses the limitations of not being able to access BIOS.
I think if someone were capable, they could devise a way to sneak DOS into a firmware build and replace the built-in TOS with it. The main problem is the 512k "storage." One would basically have to keep the OS inside a 512k "drive." Not sure how feasible that is.
I think it would great if someone could hack the wt1200le to drop a DOS loader package. Basically, you would have enough OS to boot, then it would create a ramdrive that the OS in unpacked into with whatever games/apps you were going to run in DOS. The main issue I see with the 512kb boot space is that it would have to house the "MBR" etc PLUS the compressed disk image. The issue with the 32MB RAM is that the ramdrive would be limited to roughly 20-25MB. That's a 20MB hard drive. Not a lot to say the least. The other problem you have is that none of the data can be saved back out again. So, if you were playing a game, you could save the game as long as the unit was powered on, but once you turned it off, the ramdrive is gone and so is whatever save games you had.
Still, it would be a cool project if it were possible.
*Update 03/15/2021 - I found someone who provided the 4.4.079i firmware image and I setup my desktop as a FileZille FTP server. In the 1200LE, I configured the network settings to point to my desktop and it upgraded to the original OS. The person also provided 5.2_035 firmware, which I then tried on the device. The updated OS runs VERY quickly, but the mouse wouldn't CLICK. I could move it around the screen, but the system would not register any mouse clicks. Weird.I reverted back to 4.4.079i and everything seems fine.
*Note: My unit was running v 4.4.079i when I got it. I found a firmware "update" that turned out to be a downgrade to 4.4.010i. That downgrade killed the USB mouse. Well, technically, a USB mouse kills the OS, causing it to throw up a "divide by zero" error. I am still looking for the firmware to upgrade back to where I was.
*Note: If you are presented with a login screen, turn off the device. Turn it back on. While it is booting, keep spamming the G key on your keyboard. The unit will force itself into a "Factory Reset" mode which will eliminate the login screen.
Mar 4, 2021
Thin Client: HP T5710 (Died during testing)

I bought an HP t5710 off eBay recently. I had seen a couple of videos and read multiple forum posts about the t5710's ability to serve as a cool, compact DOS gaming rig. In addition to DOS, I thought I'd see what else we could throw at it. First up, the specs for the one I bought:

CPU - Transmeta Crusoe 800MHz
GPU - Radeon 7000M
RAM - 1xDDR SODIMM Socket
Sound - Via AC97 Compatible (Use VIASBCFG for sound, see below)
Storage - 44-pin DOM (Disk on Module) 2.5-inch 44-pin IDE PATA Interface
RJ45 - 10/100 VIA Rhine Family Networking
USB Ports - 4x USB 2.0 (all located on back)
Video Port - VGA Connector
Power Requirements - 12V, 3.33A AC Adapter
Other Ports - Internal PCI slot (requires 90-degree angle adapter), Audio Out (Headphone), Mic in, PS/2 Keyboard, Parallel, 9-pin Serial, Kensington
OS - Windows XP Embedded (WinXPE) with various programs, VERY limited access rights
BIOS - F10 to enter BIOS. Phoenix AwardBIOS installed (Version 786R1 v1.04) - Options included just about everything you would expect from a computer built circa 2004 (as this one was). You can set time/date, boot device, passwords, enable/disable various onboard devices, etc. You can also enable USB mouse in BIOS so that it works in DOS!
You can boot from USB flash drives, USB CD drive, or USB Floppy.

DISASSEMBLY - There are two screws on the back of the unit. Once removed, the cover comes off after a bit of manipulation. There are a couple of plastic clips that keep the cover in place. I clipped them off to make future removal much easier. Once the outside cover is removed, there is a metal shield with two screws that must be removed. Once done, the metal cover lifts off easily. There is a speaker screwed into the metal lid, so USE CAUTION when lifting the cover, as the lead wires from the speaker plug into the motherboard. The connector for the speak is easily removed for unabated access to the system.
NOTE: You can replace the DOM with a ribbon/sd card adapter to provide more storage/flexibility. Or, you can buy larger capacity DOMs. I suggest at least a 4GB, though I have seen them as large as 32GB.
OPERATING SYSTEMS ([works] [partial] [failed])
DOS 6.22 PARTIAL (512MB RAM, 256MB DOM) [works] - Booted from a DOS USB stick that had various games, VIASBCFG, MOSLO, and other software installers. I then installed from USB without issue. Ran FDISK, formatted drive, copied relevant files. Set the AUTOEXEC.BAT with the following Sound Blaster environment: SET BLASTER=A220 I7 D1 P330 J0 then added VIASBCFG /v50 (to set volume at 50%) and VIAFMTSR (for FM synth). I had to use MoSlo in order to install games like Duke3d and Wolf3d, but once installed, the games ran fine without MoSlo. Some games would not run at all (Monkey Island Demo, for example), so be aware of that.
NOTE: The Network Adapter uses IRQ 5, which will conflict with VIASBCFG Sound drivers for DOS. Be sure to set the sound IRQ to 7.
Windows for Workgroups WORKS (WFW 3.11) (512MB RAM, 256 DOM) [works] - During my DOS install, I had copied the WFW installation files to the USB stick then copied those to the DOM after DOS was installed. The WFW setup ran without issue. I did NOT install network drivers during install. After reboot, added Sound Blaster 1.5 from the Control Panel. Selected A220 and IRQ 7. After Windows restarted, I had sound. I found Rhine-II drivers for the VT6102 networking and installed those.
Windows 95 PARTIAL (512MB RAM, 256 DOM) [limited] - This was a bit more involved. I created a VirtualBox MSDOS installation and converted that to an IMG file (Details in footnotes below). I then Copied the Win95 install files to a Win95 folder on the SD card. Be sure to deleted the CONTENT folder if there is one. Booted the t5710 with the SD card. I formatted the D drive (which is the DOM card). Copied DOS and Win95 setup to D drive. Shut down device, removed SD card, rebooted. Delete CHL*.* and AOL*.* from the Win95 directory. Start Win95 setup. Chose Minimal (just above Custom). Install asked for several files we had deleted but let me just SKIP those during the "Copying files" section. PC rebooted with "Getting ready to run Win95..." Setup finished and rebooted the PC. After reboot, Win95 found the monitor and presented the desktop! Windows showed 75MB free on drive while installing the stupid IE Active Desktop junk. Java Error (since we deleted java). System booted fine. Grabbed the USBSUPP.EXE file, saved it to the DOS Flash Drive, booted with the DOS Flash Drive and copied the USBSUPP to the DOM. Rebooted into Win95 and ran USBSUPP. System rebooted. Went into Device Manager and updated any USB devices. Installer complained about uhcd.sys, but I was able to browse to Windows\System to find it. Unfortunately, the system locked up after an "Unknown Device" wizard popped up. The USB driver could no longer see the keyboard and mouse attached. Of course, I have no PS/2 keyboards or adapters. Contacted a friend of mine at a local school and he had an adapter! Got the adapter to work with a USB ball mouse (optical would not work). I could not find a keyboard that would work with the USB add-on. So, I removed the USB support. Once I did that, the keyboard and mouse worked as usual. Go figure. I even tried the XUSBSUPP, but that did not work either. Specifically, the drivers in stalled, but the keyboard no longer worked and I eventually had a BSOD. I gave up on this part of the project.
Windows 98SE PARTIAL (512MB RAM, 256MB DOM) [limited] - I followed the steps outlined at RMPrepUSB for installing Win98 via Easy2Boot. I used UltraISO to edit the Win98SE.iso file. In retrospect, I should have not only deleted the files mentioned, but also ALL of the folders under the Win98 folder, as I do not believe they are needed and the copy process is SLOW on the t5710. The DOM had already been partitioned from the Win95 install above, so I skipped those steps and jumped to formatting the DOM. Once the format was done, I created the B:\TEMP folder. NOTE: You MUST delete all the files under the WIN98\OLS folder, otherwise setup complains about drive space on B. Run SETUP /T:b:\temp to start the install. My install complained about a Windows NT format. I chose COMPACT install. Skip the startup disk. When prompted to remove disks, unplug the USB and hit Enter. System will reboot. Continue installation. My system booted with 70MB free on the DOM. I restarted the system and booted from a DOS USB then copied the USB drivers from PhilsComputerLab to the system. I figured this would open up the door to grab other drivers directly from a USB stick. Rebooted to Win98 and ran setup for the first set of drivers. No luck. I grabbed NUSB32E.exe and copied it from a DOS boot-up USB to the Win98 and ran it. After a couple reboots, it detected my USB flash drive! At this point, trying to install various drivers was fruitless due to storage constraints.
Win98SE (256MB RAM, 4GB DOM) - UNTESTED*
Windows XP Embedded WORKS (Factory Reset) - (512MB RAM, 256MB DOM) [working] - Downloaded the SP29705.EXE file that contains the SuperPAQ factory image from HP. I tried to run their flash utility, but it never worked. So, I chose the option to create an ISO then burned the ISO to a cd. I booted the device with a USB CD drive and started the restore process. It is not fast. Removed boot media, restarted. XP continued setup. Was presented with locked PC with arrow on screen. Manually rebooted. After a few moments, the factory-restored XPe appeared and finished setting up devices, software, etc. This also takes a LONG time (10 minutes or more). Asked to restart device, restarted. After a few moments, presented with desktop. VERY limited access. Cannot access My Computer, drives, etc. Limited Control Panel access. An HP Sys Info app shows 57MB free on the DOM along with some other info about installed software, hardware, etc.
Windows XP (256MB RAM, 4GB - UNTESTED*
Windows 7 - UNTESTED*
Windows 10 - UNTESTED*
*NOTE - I inserted a USB stick in order to try to install Win98SE with the 4GB DOM. When I did, the system would no longer boot. I swapped DOM, RAM, etc and unplugged everything except power and VGA, but the system would never POST again. Pretty sure the USB stick shorted the system somehow.
– To Create DOS SD Card - From "Dustin" on theinstructionlimit.com. Create a virtual drive with the same specs as your SD/CF card. (I don’t think the size actually matters, but just in case) – Install DOS on to the virtual drive via VirtualBox and the DOS floppy images. – Open powershell or cmd and navigate to the VirtualBox install directory – Run .\vboxmanage internalcommands converttoraw "C:\PATH\TO\YOUR\VIRTUALDRIVE.vdi" "C:\PATH\TO\YOUR\VIRTUALDRIVE\NameOfImage.img" – Plug in your CF/SD card. – Open Rufus (https://rufus.ie/) – Select your CF/SD card, and browse to find the image you created above.
Feb 12, 2021
Thin Client Adventures: DevonIT TC2D DeTOS 7.1.1 (Update: Feb 25 2021)

I picked up a DevonIT TC2D "Zero Client" device for about $5.00 on eBay. It came new in the box (or appeared new) with a power adapter, instructions, and a DVI/VGA adapter. Let's look at some specs:
CPU - VIA Eden 1 GHz
GPU -VIA Chrome9 (according to LSPCI)
RJ45 (Wired Ethernet) -Realtek 8169 (from LSPCI)
Sound -Azalia HDA Controller (Intel HDA)
Storage -1GB DOM (2.5-inch IDE riser connector)
RAM - 1xDDR2 SODIMM
USB Ports -4x USB 2.0 (2 on back, 2 on front)
Video Ports - DVI Connector
Power Requirements - 12V, 3A AC Adapter
Other Ports -PS/2 Keyboard connector on back, Kensington slot on back
BIOS: Phoenix AwardBIOS
OS: DeTOS 7.1.1 20120508
Notes: HDD Auto Detection, Provisions for IDE Slave Device, Set Boot Priority, Boot from USB, Azalia Disable Feature, USB Settings (KB/Mouse can be set to USB), Power Management Options.
OPERATING SYSTEMS:
DETOS 7.1.1 (1GB RAM, 1GB DOM) - The device boots to a DevonIT (displayed as "devonIT") and attempts to search for an auto-configuration server.
After that fails, user is presented with an option to boot to DeTOS or ZeroClient. I chose DeTOS.

I was presented with locale selections.

Next, networking options. This includes wired and wireless. Also options for IP configuration, included option to boot with DHCP.


The next screen is "Thin Client Management." This allows setup of managed or unmanaged settings, adding an "agent" password, and whether or not to allow users to take screenshots.


Next up, the tech can set up remote session connection info, if desired.

Then, we are presented with "Local Storage Options." This allows the system to keep (or not keep) certain information on the installed DOM.

Next up, we can choose to save settings to Echo. This basically creates a machine profile for this device on the management server. Since i don't have one, I just clicked "Finished."

After a few moments, I was presented with the DeTOS desktop.
The desktop displayed the time and date (incorrectly) in the lower right along with a couple icons. Once of which (the little blue "devonIT" logo) presented config info. The "Start button" only had a Control Panel option and selections to shut down or reboot.

Control Panel provides a slew of information and possible connections. Each item listed allows the user to add a connection to the certain type (Citrix ICA, VDI-in-a-Box, rDesktop, etc). When I attempted to set DHCP, I received an error screen. Note: I was trying to figure out the wifi. Wired was not plugged in.

I plugged in a network cable and the screen went blank for a moment. When the desktop returned, I had an IP address.


Feb 25 2021: I ran into issues with the system itself after switching over to the "ThinOS" option. I reached out to Clientron in Japan and was sent a link to a reflash utility. I ran the utility, installing the flash software onto a usb drive. After booting the device from the drive, I followed the prompts to reinstall the software onto the original DOM. I recommend NOT having a mouse plugged in. My system screen was filled with connects/disconnects coming from the USB mouse which didn't seem to affect the install process, but made following along difficult. After it finished, the system rebooted. I was greeted with the DevonIT boot screen and then the screen went blank for a bit. I tapped an arrow key and was met with the OS selection screen as above!